• Home
  • Beauty
    • ALL BEAUTY
    • SKIN CARE
    • HAIR CARE
    • BODY CARE
    • NAIL CARE
    • BEAUTY TIPS
  • FASHION
    • ALL FASHION
    • DIY STYLE
    • DIY ACCESSORIES
  • Eco-friendly
    • ALL ECO
    • ZEROWASTE HOME
    • ZEROWASTE BEAUTY
    • UPCYCLE STLYE
  • Decor
    • ALL DECOR
    • DIY DECOR
    • WALL ART
    • UPCYCLE DECOR
    • CRAFTS
    • DIY FESTIVE
  • SEWING
    • ALL SEW
    • SEW STYLE
    • SEW ECO
    • SEW PROJECTS
  • Holiday
    • ALL FESTIVE
    • DIY CHRISTMAS
    • DIY AUTUMN
    • DIY HALLOWEEN
    • VALENTINE'S DAY
    • GIFTS
  • Dine
  • LIFESTYLE
  • Contact
  • Collaborate
  • Subscribe
  • POLICY
Powered by Blogger.

Opal Crown


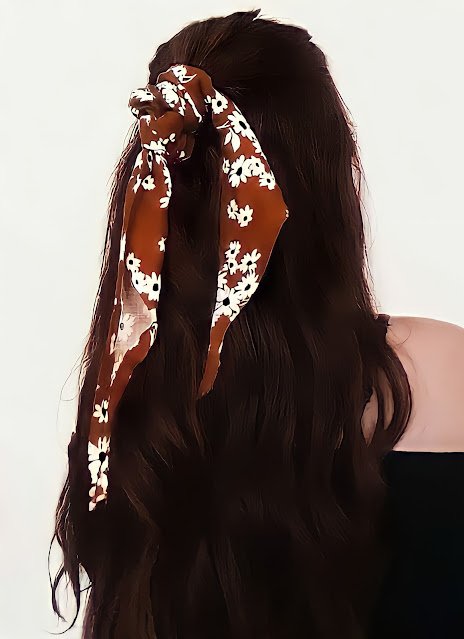
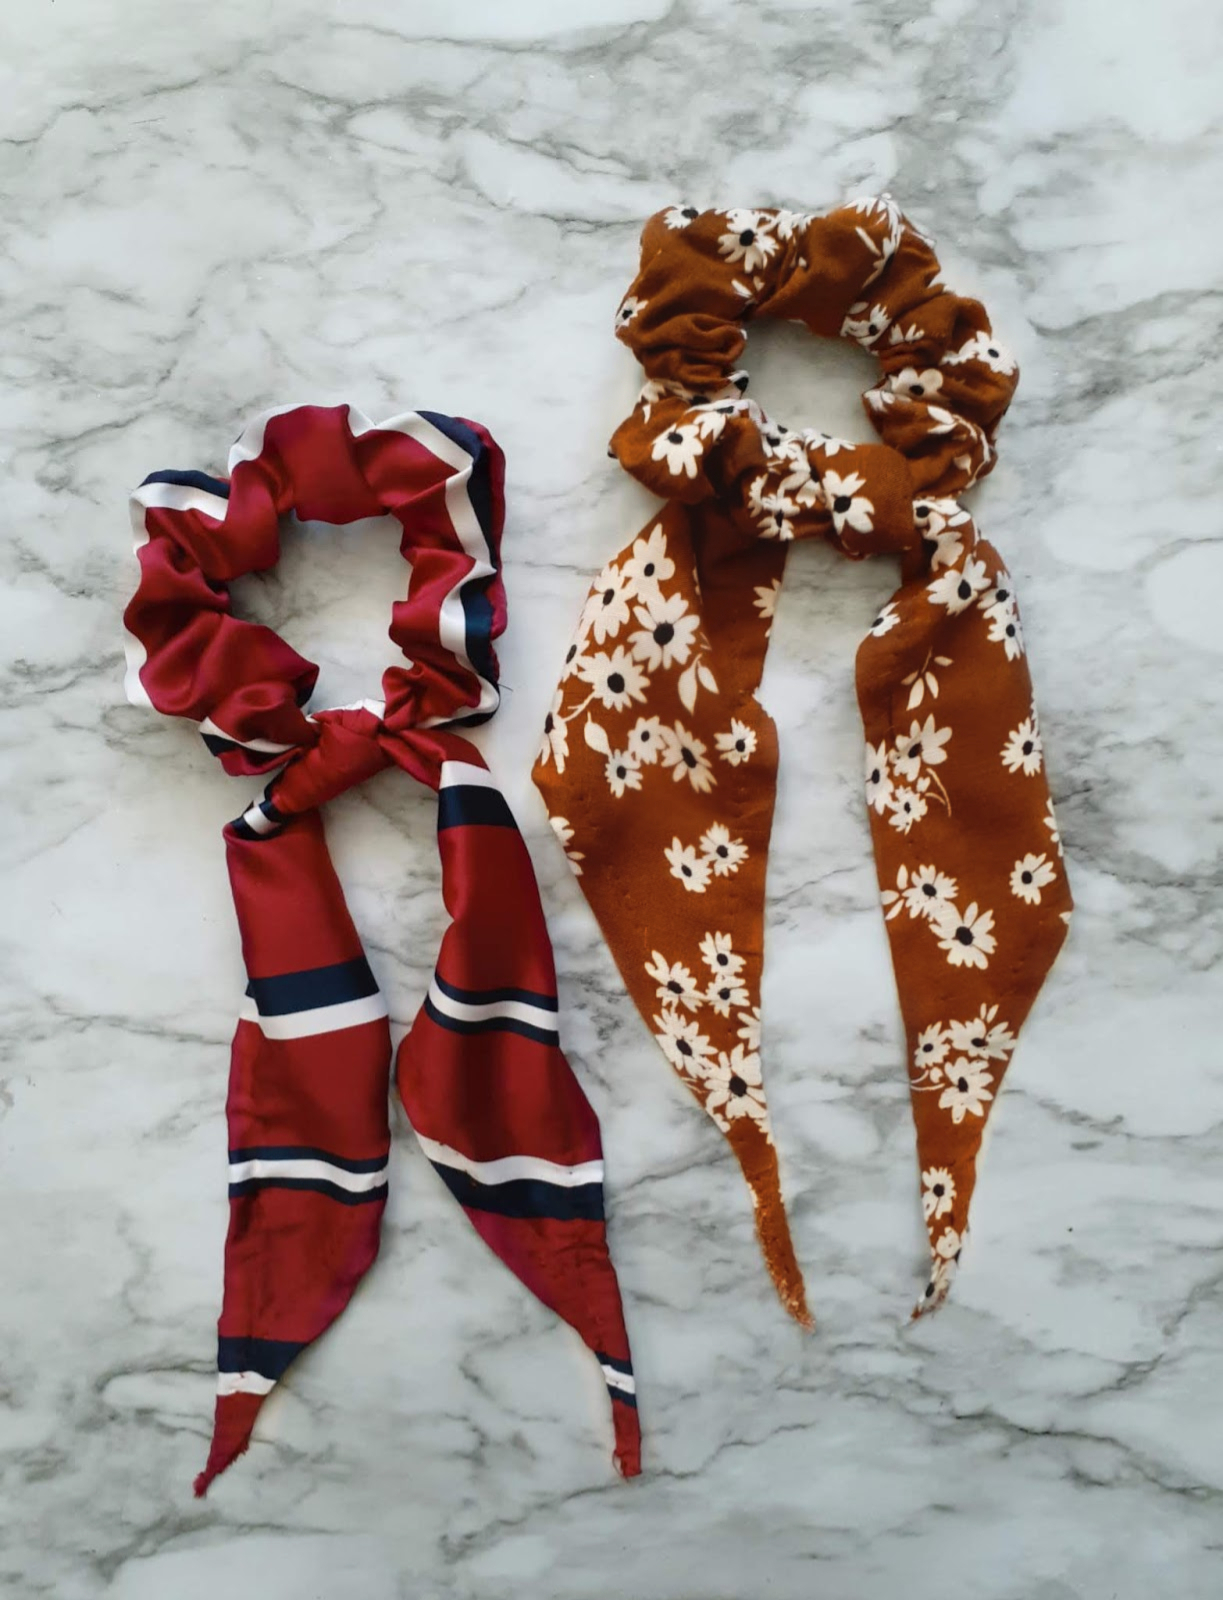
Do you have any fabric scraps leftover from previous projects? If that's the case, don't toss them out. Instead, make hair scrunchies. I have a lot of unused bits that I've accumulated over the years and decided today would be the perfect opportunity to put them to good use. Except for this time, I'm not going to make traditional scrunchies. Instead, I tried something else and made a scarf scrunchie. They've become increasingly popular in recent years. I've never purchased one, so why not make a few now that I have so much free time? Hair scrunchies, after all, are considerably better for our hair and a lot cuter than normal hair ties.


MATERIALS NEEDED:

  • Fabric scarp
  • Needle & thread
  • Elastic band
  • Safety pin
  • Pins
  • Scissors
  • Measuring Tape


DIRECTIONS:

1.) Cut a piece of fabric 22 inches by 4 inches. Fold the fabric in half with the right sides facing each other and pin in place.


2.) Stitch straight across, leaving a 1/2 inch seam allowance, remove the pins, and flip the tube inside out.


3.) Cut a piece of elastic 9 inches long, and place through the tube with a safety pin.


4.) Tie 2 knots to secure the elastic.


5.) Fold the edges in, overlap the ends together, and sew in place.


6.) To make the scarf, cut a piece of fabric, a shape similar to a triangle 28 inches wide by 18 inches.


7.) Fold over the edges twice, and press.


8.) Stitch around the entire scarf.


9.) Scrunch the scarf in the middle and tie it to the scrunchie.


YOU'RE ALL FINISHED!


You can always remove the scarf and just wear the scrunchie. It looks cute either way.


Share
Tweet
Pin
Share
No comments
Older Posts

About me


Hi there! My name is Stefany. I am the writer and creator of Opal Crown. a crafty blog that covers DIY projects, beauty, fashion, decor, lifestyle, sustainability, and much more.

Subscribe For Weekly Updates

* indicates required

Popular Posts

  • DIY Bandana Halter Top
  • DIY Flaxseed Mask For Hair Growth
  • DIY Beaded Phone Charm
  • DIY Aloe Vera Mask For Glowing Skin
  • Playhouse Makeover
  • Fringed Tassel Earrings
  • How To Apply Press On Nails
  • TASSEL FAN EARRINGS

Featured Post

DIY Embroidered Christmas Ornaments

Are you looking for a unique gift idea or new, adorable ornaments to hang on your tree this year?   I have the answer—embroidered ornaments!...

Click To Download

Click To Download
Stay focused and organized throughout the day with a daily planner to help you stay on track with your daily tasks. There are 3 different styles to choose from.

Follow Us

  • instagram
  • pinterest
  • youtube
  • tik tok

Created with by ThemeXpose | Distributed by Blogger Templates