• Home
  • Beauty
    • ALL BEAUTY
    • SKIN CARE
    • HAIR CARE
    • BODY CARE
    • NAIL CARE
    • BEAUTY TIPS
  • FASHION
    • ALL FASHION
    • DIY STYLE
    • DIY ACCESSORIES
  • Eco-friendly
    • ALL ECO
    • ZEROWASTE HOME
    • ZEROWASTE BEAUTY
    • UPCYCLE STLYE
  • Decor
    • ALL DECOR
    • DIY DECOR
    • WALL ART
    • UPCYCLE DECOR
    • CRAFTS
    • DIY FESTIVE
  • SEWING
    • ALL SEW
    • SEW STYLE
    • SEW ECO
    • SEW PROJECTS
  • Holiday
    • ALL FESTIVE
    • DIY CHRISTMAS
    • DIY AUTUMN
    • DIY HALLOWEEN
    • VALENTINE'S DAY
    • GIFTS
  • Dine
  • LIFESTYLE
  • Contact
  • Collaborate
  • Subscribe
  • POLICY
Powered by Blogger.

Opal Crown

 Am I the only one who finds it challenging to find the perfect pair of denim jeans? I prefer to wear longer shorts, which can be hard to find in stores. Summer in California can be brutal, so shorts are a must! I went through my closet and found a pair of old jeans that I no longer wear. (If you can't find any jeans to turn into shorts, you can always take a trip to the thrift store. They have so many great options.


MATERIALS NEEDED:

  • Jeans
  • Scissors
  • Ruler
  • Chalk or marker
  • Iron


DIRECTIONS:

1.
) TRY ON.
Begin by putting on the jeans and determining how short you want them. Put your finger on the highest point you want them to be and make a mark there with a marker. (Because I want to fold the ends, I will mark the line lower than I want the shorts to be.)

2.) MEASURE.
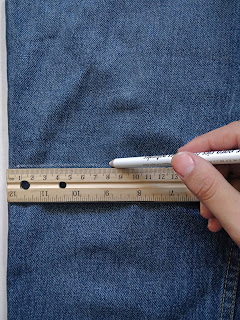
Take off your jeans and lay them on a flat surface. Draw a line along the line you previously made. (A ruler comes in handy for keeping the line straight.)


3.) START CUTTING.
Carefully cut along the line you just drew.


4.) FOLD.
Fold the jeans in half to cut the other side so they're the same length.

5.) CREATE A CUFF:
 Roll the edge up 1-2 inches to create a cuff. Fold it once more. Repeat on the other side.


6.) IRON.
Finish by ironing the shorts, especially focusing on the cuffs.)

Share
Tweet
Pin
Share
No comments


Last weekend, I went to the craft section at Walmart to buy some paint and a couple of other stuff I needed, when I stumbled upon some bandanas. I knew instantly what I needed them for and immediately grabbed a few. Once an idea pops in my head, there's no going back, I need to just go for it and do it. Halter tops are one of my favorite tops to wear during the summertime, so when I saw the bandana, the first thing that crossed my mind was to make my own. Several online stores already sell bandana tops but are usually priced anywhere between 20-40 dollars. The bandana itself cost me 1 dollar and it took me less than 10 minutes to make.


MATERIALS NEEDED:
  • 1 Bandana
  • 2 Strings
  • Needle & Thread
  • Scissors


DIRECTIONS:

1.) Start by folding the bandana in half to form a triangle.


2.) Fold over the top part and sew straight across.


3.) Fold over the two bottom sides of the bandana and sew.


4.) To create the neckline, insert one of the strings through the tunnel of the top.


5.) Repeat the same step on the bottom to be able to tie it from the back.


ALL DONE!

Share
Tweet
Pin
Share
2 comments


Making a tie front top is a lot easier than you'd think and can be made in under 5 minutes. Seriously it's that easy to create, all you need is an old top, some fabric glue, and a pair of scissors. In no time you'll transform an ordinary top into something more stylish and modern.


MATERIALS NEEDED:

  • Old Top
  • Fabric Glue
  • Scissors


DIRECTIONS:

1.) Start by folding the t-shirt in half.


2.) Cut straight across the front side of the shirt. Continue to cut until you reach the top of the neckline and then cut it in a v-shape.


3.) Carefully cut the rest of the collar, as shown in the picture below.


4.)  Glue along the edges of the top, fold over, and press.


5.) To finish off the top, tie a knot on the front side, and it's done!


Share
Tweet
Pin
Share
No comments


 If there's something I enjoy doing, is customizing my clothes. Even though my sewing skills aren't the best, that never stops me from transforming any piece of garment I choose to work on. That's why I like to tie-dye because you can change the way your clothes look with minimal effort. All you need for this project is fabric dye, a 100% cotton t-shirt, a pair of gloves, and a couple of rubber bands. I loved how each piece of clothing turned out unique. I couldn't wait to share with you guys how easy it was to make.


MATERIALS USED:

  • Plain tee 100% cotton
  • Tie-dye Kit
  •  Rubber bands
  • Plastic bag


DIRECTIONS:

Style#1

1.) Dampen the garment to allow the dye to blend better.

2.) For this particular shirt, I will be using the "swirl" method, but you can do any style you'd prefer.

Pinch the center of the shirt and gently twist the shirt over multiple times until you form a swirl.


3.) Use rubber bands to hold the fabric in place.

4.) Prepare the dye according to the instructions and begin to tie-dye.

*Make sure to use gloves for this part, as it can get really messy*


5.) Flip the shirt over and add more dye.

6.) Place the shirt in a bag and wait according to the instructions of the tie-dye kit.

(I waited 8 hours)

7.) Once the dye has set, remove the rubber bands and rinse in hot water until the water runs clear.

8.) Wash and dry the shirt.


Style #2

1.) For the tank top,  scrunch the bottom of the shirt and continue to do so until you reach the top.

2.) Use rubber bands to hold the top in place.

3.) Cover the entire top with the tie-dye.

4.) Placed it in a plastic bag for 8-10 hours and wash it afterward.


RELATED POSTS:
  • DIY BLEACH TIE DYE
  • DIY LACE BRALETTE
  • DIY SCRUNCHIE
  • DIY SCARF SCRUNCHIE
Share
Tweet
Pin
Share
No comments


Tie-dye is making a huge comeback, I've seen everyone on social media rocking this style, and for the past couple of days, I've too, been wanting to try this trend by DIYing some pieces for myself. I loved how awesome each garment turned out, that I must admit I got a little carried away and tie-dyed everything I could find in my closet. Literally, everything I could find, even my socks! Learn how easy it is to bleach tie-dye your garments down below.


MATERIALS USED:

  • Black Tee ( 100% cotton)
  • Bleach
  • Rubber bands
  • Spray bottle or squeeze bottle


DIRECTIONS:

There are several different methods of tie-dyeing your clothes, but for today, I'll be showing you the "scrunch" method.
1.) Loosely scrunch and wrinkle the shirt together.


3.) Tie the garment with rubber bands.

Then, submerge the shirt in water, (this will help the bleach mixture apply evenly.)


4.) Pour the solution on the fabric. Then flip the shirt over and pour more bleach to the backside. ( I recommend doing this part outdoors.)


5.) Let the shirt bleach to the desired shade, making sure to check on it frequently. 

(I left my shirt bleach for 10 minutes.)


6.) Rinse the garment thoroughly until the water rinses clear, remove the rubber bands, and wash.


7.) Hang the shirt to dry, and you are all done!


SIMILAR POSTS:


DIY TIE DYE
DIY BANDANA TOP

DIY LACE BRALETTE

DIE TIE FRONT TOP

Share
Tweet
Pin
Share
No comments

Do you have any fabric scraps leftover from previous projects? If that's the case, don't toss them out. Instead, make hair scrunchies. I have a lot of unused bits that I've accumulated over the years and decided today would be the perfect opportunity to put them to good use. Except for this time, I'm not going to make traditional scrunchies. Instead, I tried something else and made a scarf scrunchie. They've become increasingly popular in recent years. I've never purchased one, so why not make a few now that I have so much free time? Hair scrunchies, after all, are considerably better for our hair and a lot cuter than normal hair ties.


MATERIALS NEEDED:

  • Fabric scarp
  • Needle & thread
  • Elastic band
  • Safety pin
  • Pins
  • Scissors
  • Measuring Tape


DIRECTIONS:

1.) Cut a piece of fabric 22 inches by 4 inches. Fold the fabric in half with the right sides facing each other and pin in place.


2.) Stitch straight across, leaving a 1/2 inch seam allowance, remove the pins, and flip the tube inside out.


3.) Cut a piece of elastic 9 inches long, and place through the tube with a safety pin.


4.) Tie 2 knots to secure the elastic.


5.) Fold the edges in, overlap the ends together, and sew in place.


6.) To make the scarf, cut a piece of fabric, a shape similar to a triangle 28 inches wide by 18 inches.


7.) Fold over the edges twice, and press.


8.) Stitch around the entire scarf.


9.) Scrunch the scarf in the middle and tie it to the scrunchie.


YOU'RE ALL FINISHED!


You can always remove the scarf and just wear the scrunchie. It looks cute either way.


Share
Tweet
Pin
Share
No comments
Older Posts

About me


Hi there! My name is Stefany. I am the writer and creator of Opal Crown. a crafty blog that covers DIY projects, beauty, fashion, decor, lifestyle, sustainability, and much more.

Subscribe For Weekly Updates

* indicates required

Popular Posts

  • DIY Flaxseed Mask For Hair Growth
  • DIY Aloe Vera Mask For Glowing Skin
  • Brightening Turmeric & Aloe Gel Mask
  • DIY HAIR & SCALP DETOX MASK (+ How to use it)
  • Fringed Tassel Earrings
  • DIY Beaded Phone Charm
  • How to make rice water for hair growth
  • DIY Rose Petal Body Scrub

Featured Post

DIY Embroidered Christmas Ornaments

Are you looking for a unique gift idea or new, adorable ornaments to hang on your tree this year?   I have the answer—embroidered ornaments!...

Click To Download

Click To Download
Stay focused and organized throughout the day with a daily planner to help you stay on track with your daily tasks. There are 3 different styles to choose from.

Follow Us

  • instagram
  • pinterest
  • youtube
  • tik tok

Created with by ThemeXpose | Distributed by Blogger Templates