• Home
  • Beauty
    • ALL BEAUTY
    • SKIN CARE
    • HAIR CARE
    • BODY CARE
    • NAIL CARE
    • BEAUTY TIPS
  • FASHION
    • ALL FASHION
    • DIY STYLE
    • DIY ACCESSORIES
  • Eco-friendly
    • ALL ECO
    • ZEROWASTE HOME
    • ZEROWASTE BEAUTY
    • UPCYCLE STLYE
  • Decor
    • ALL DECOR
    • DIY DECOR
    • WALL ART
    • UPCYCLE DECOR
    • CRAFTS
    • DIY FESTIVE
  • SEWING
    • ALL SEW
    • SEW STYLE
    • SEW ECO
    • SEW PROJECTS
  • Holiday
    • ALL FESTIVE
    • DIY CHRISTMAS
    • DIY AUTUMN
    • DIY HALLOWEEN
    • VALENTINE'S DAY
    • GIFTS
  • Dine
  • LIFESTYLE
  • Contact
  • Collaborate
  • Subscribe
  • POLICY
Powered by Blogger.

Opal Crown


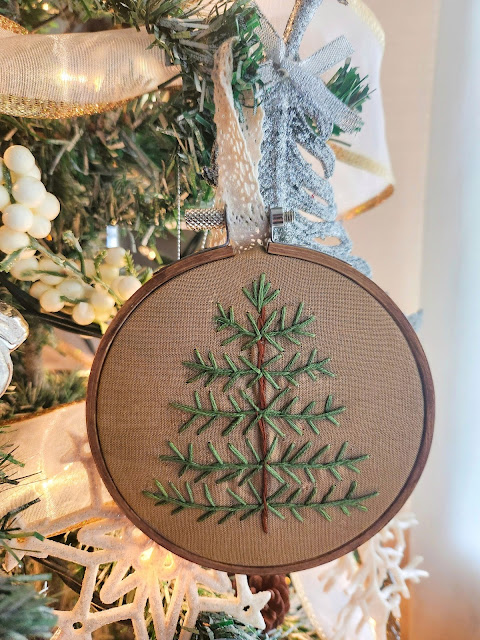
Are you looking for a unique gift idea or new, adorable ornaments to hang on your tree this year? I have the answer—embroidered ornaments! They add the perfect handmade touch to any Christmas tree. 

Year after year, I use the same decorations.  I really wanted to include something unique. I wanted to add a personal touch, and what better way to do so than with embroidery art? So grab a warm blanket and your favorite cup of coffee and let's get sewing.


 MATERIAL NEEDED:

  • Wood embroidery hoops
  • Embroidery floss
  • Embroidery needles
  • Scissors
  • Pencil
  • Ribbon or twine for hanging
  • Fabri-tac glue
  • Optional: Felt
  • Optional: Brown paint and a paintbrush 


DIRECTIONS:

1.) This step is optional. Water down some brown paint to stain the wood from the embroidery hoop. It adds a little something extra to the overall look.


2.) Make a few sketches of your design in a notebook before drawing on your fabric. When you're satisfied with the look, transfer it to your fabric.


3.) Let's move on to the Christmas tree. For the trunk, I used the back stitch method using brown thread. 


4.) I used the same stitch for the tree leaves.


5.) To hang the embroidery hoop, tie a ribbon or piece of twine to the top.


6.) As for the back, apply glue all around the outer edge. Fold the fabric over and press it into the inner ring of the hoop as you go around it.


7.) This step is optional but ideal if you want to cover the back of the stitches, trace around the inner hoop on the felt fabric, and cut the circle out.


8.) Place the felt on the back of the hoop and attach it with a running stitch.


All done!


Share
Tweet
Pin
Share
4 comments


Good morning everyone, today I'm going to show you how to make this beautiful embroidery hoop art design. I got the idea of painting a woman's portrait with elegant flowers from a YouTuber called Dalia. She's so talented and creative. ( I'll leave a link to her youtube channel here.) In her video, she used pressed flowers as the women's hair. I didn't have any on hand, so I decided to embroider mine instead. If you are new at embroidery,  I used the wagon wheel pattern to create beginner-friendly roses. 


MATERIALS:

  • Embroidery hoop
  • Embroidery thread & needle
  • linen Fabric
  • Puffy Paint
  • Scissors
  • Pencil


DIRECTIONS:

1.) Sketch a simple portrait of a woman with a pencil.


2.) Trace the woman's silhouette with black paint. 


3.) Allow the paint to dry.

5.) Draw a circle (the size you want the rose to be.) 

6.) Draw 5 lines coming out from the center. ( It should look like a wagon wheel.)


7.) Bring the needle up through the middle of the wagon wheel and stitch the five lines.

8.) Next, weave the needle in and out of the wagon wheel. (Weaving the thread over and under.) 


9.)Keep weaving the needle until the wagon wheel is full.


10.) Decorate the roses with leaves.


Share
Tweet
Pin
Share
No comments
Older Posts

About me


Hi there! My name is Stefany. I am the writer and creator of Opal Crown. a crafty blog that covers DIY projects, beauty, fashion, decor, lifestyle, sustainability, and much more.

Subscribe For Weekly Updates

* indicates required

Popular Posts

  • Fringed Tassel Earrings
  • DIY Flaxseed Mask For Hair Growth
  • How to make rice water for hair growth
  • DIY Bandana Halter Top
  • DIY Beaded Phone Charm
  • DIY Rose Petal Body Scrub
  • DIY HAIR & SCALP DETOX MASK (+ How to use it)
  • DIY Aloe Vera Mask For Glowing Skin

Featured Post

DIY Embroidered Christmas Ornaments

Are you looking for a unique gift idea or new, adorable ornaments to hang on your tree this year?   I have the answer—embroidered ornaments!...

Click To Download

Click To Download
Stay focused and organized throughout the day with a daily planner to help you stay on track with your daily tasks. There are 3 different styles to choose from.

Follow Us

  • instagram
  • pinterest
  • youtube
  • tik tok

Created with by ThemeXpose | Distributed by Blogger Templates