• Home
  • Beauty
    • ALL BEAUTY
    • SKIN CARE
    • HAIR CARE
    • BODY CARE
    • NAIL CARE
    • BEAUTY TIPS
  • FASHION
    • ALL FASHION
    • DIY STYLE
    • DIY ACCESSORIES
  • Eco-friendly
    • ALL ECO
    • ZEROWASTE HOME
    • ZEROWASTE BEAUTY
    • UPCYCLE STLYE
  • Decor
    • ALL DECOR
    • DIY DECOR
    • WALL ART
    • UPCYCLE DECOR
    • CRAFTS
    • DIY FESTIVE
  • SEWING
    • ALL SEW
    • SEW STYLE
    • SEW ECO
    • SEW PROJECTS
  • Holiday
    • ALL FESTIVE
    • DIY CHRISTMAS
    • DIY AUTUMN
    • DIY HALLOWEEN
    • VALENTINE'S DAY
    • GIFTS
  • Dine
  • LIFESTYLE
  • Contact
  • Collaborate
  • Subscribe
  • POLICY
Powered by Blogger.

Opal Crown

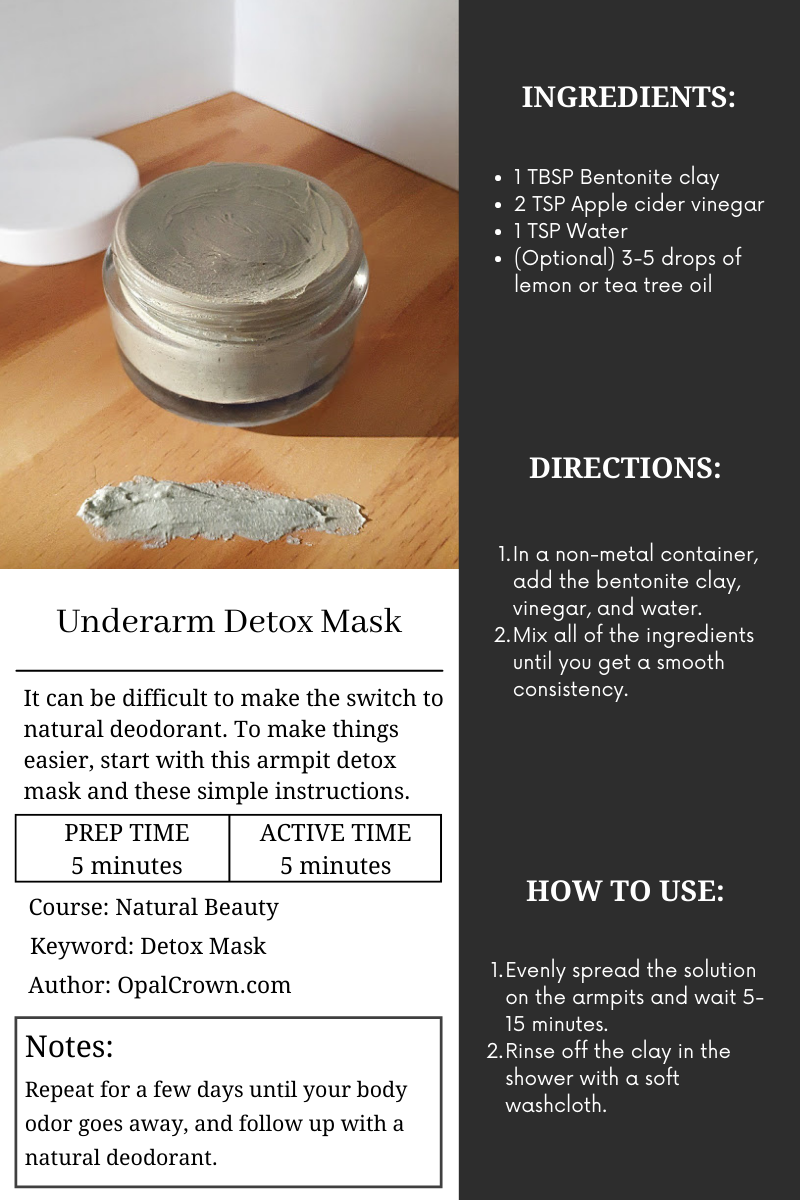
Remember when twisted candlesticks went viral on tik tok? I was totally on board with this trend, but I never got the chance to do it for whatever reason. On the weekends I like to binge-watch decor videos on YouTube. I watched Lone Fox's video ( I'll leave the link to it here if you want to check it out ) where he shows how easy it is to transform ordinary candles into trendy twisted candlesticks. His video was a sign from the universe to finally do it. I found a couple of candlesticks I had bought for this particular project over a year ago at Goodwill. You can definitely purchase similar candlesticks on Amazon. To get started, you'll need the following supplies...


  • Tapper Candlesticks
  • Tall Vase
  • Warm Water

DIRECTIONS:

1.) In a tall vase, add warm water (not hot) and candlesticks.

2.) Soak the candlesticks in the warm water for 15 minutes.


3.) Pull a candle from the vase, and carefully start to mold the candle into a squiggle.


4.) For the second style, use a rolling pin to flatten the candle and twist.


5.) When finished, run the candles under cold water to solidify the new look.

Let me know which style was your favorite!
Share
Tweet
Pin
Share
1 comments


 Artificial nails are a good alternative for those of us that don't have the time or money to get them professionally done at the salon. They take half the time to do and are perfect for any occasion. Whether you want a simple neutral manicure or any certain design, they all look amazing no matter what style you pick. When applied correctly, press-on nails can look just as good as acrylic nails and last for two whole weeks. Keep reading for a step-by-step breakdown of how to apply press-on nails at home.


WHAT YOU'LL NEED:

  • Press-on nail kit
  • Cuticle pusher
  • Nail file
  • Nail buffer
  • Nail clipper
  • Nail polish remover
  • Cotton pads
  • Glue


DIRECTIONS:

1.) PREP YOUR NAILS.

Begin by washing your hands and removing any previous nail polish (if any.)
Wipe your clean nails with nail polish remover to get rid of any oils your nails naturally have. This will help the artificial nails adhere better to your nails and help them stay on longer. 


Use a nail clipper to trim your nails, and then use a file to smooth out the edges (make sure to file in one direction to prevent them from chipping later on.) Gently push back your cuticles, buff your natural nails, and wipe off any dust with a brush.


Grab the nail pack and take out the press-on nails that best match your natural nails. If you need to adjust the nails, gently file the sides for a better fit. Arrange the nails in the exact order you will be applying.


2.) HOW TO PROPERLY APPLY THE NAILS.

Add a small amount of glue to the artificial nail and to your real nail. Carefully place the fake nail directly over your real nail (make sure to keep the fake nail as straight as possible) and firmly press it down for 10 seconds to allow it to set. Repeat the same process to the rest of the nails. If your nails are too long, trim off the length and file your nails to the desired shape you would like them to be.


3.) PAINT YOUR NAILS.

Finally, paint your nails with your favorite nail polish color. I painted mine with multiple shades of brown for a gradient look, but you can definitely go all out and add some sparkle or any other design you would like. It's all about personal preference.


Share
Tweet
Pin
Share
No comments


I remember when phone charms were popular accessories back in the 2000s. Now that they're making a comeback, I wanted to DIY my own. This trend is so nostalgic for me, I had a few charms back in the days when flip phones were a thing. I've seen several tutorials on tik tok and noticed how easy they are to make. All you need is colorful beads and string. I purchased a few supplies at the dollar tree and got the rest at Walmart. You can find a variety of beads and craft supplies at either store for an affordable price. These charms are not only cute as accessories for your phone but also look great as chains for your keys or bags.


WHAT YOU'LL NEED:

  • Colorful beads
  • String
  • Scissors
  • Clear nail polish


DIRECTIONS:

1.) Measure the string, the size you would like the charm to be. (Mine measures 12in long)


2.) Dap a bit of clear nail polish to the end of the string to prevent it from unraveling. 


3.) Once the nail polish dries, fold the string in half to create a loop, and tie a knot. (You can see what I'm mean in the pictures below.)


4.) Now it's time to get creative and make a pattern using the beads of your choice!


5.) Thread the beads until you reach your desired length.

6.) Grab the ends and tie them into a knot. (Pull tightly to secure.)


7.) To secure the ends even more, place a drop of superglue over the knot.


8.) All done!


I also made a neutral charm to match my phone case. Let me know which charm was your favorite.


Share
Tweet
Pin
Share
1 comments


They're many gems you can find at the thrift store. I found a glass scalloped bowl and a blue tiny vase. Both items were less than 5 dollars and in perfect condition. I saw a similar ruffled bowl at ANYON that retailed for $370. I got inspired by their carved marble bowl. I wanted to recreate it using the baking soda and paint mixture. Mixing both ingredients together will create thicker textured paint. I've used this technique in the past and loved the end results. This formula creates a beautiful matte finish and will make your glass/bowl look more organic and handmade.


MATERIALS:

  • Bowl/vase
  • Baking Soda
  • Acrylic Paint
  • Paintbrushes


DIRECTIONS:

1.) In a container, add 1 part baking soda and 1 part paint. The consistency is up to you. If you want the mixture to be thicker, add more baking soda.

2.) Stir the mixture until the paint turns into a grainy texture.


3.) With a paintbrush, begin painting the bowl.


4.) Allow the paint to dry completely before applying a second coat.


5.) I repeated the same steps for the vase. I love this technique so much, I want to use this mixture to paint all of my old vases.


6.) Decorate when finished!


Share
Tweet
Pin
Share
No comments

Designing earrings is so much fun, especially if you like wearing unique jewelry. My outfits are often simple, so to spice things up, I always throw on a pair of dangling earrings. Accessories always help add interest to any of my outfits. I've been wanting new earrings, so I took the opportunity to make a new pair. I headed to the nearest craft store to buy all the supplies I needed to tackle this project.


MATERIALS NEEDED:

  • Hoop earrings
  • Earring hooks
  • Beads
  • Pliers
  • Optional: charms  (I made my own, learn how here.)


DIRECTIONS:

1.) Carefully open the hoop earring.


2.) Thread the beads onto the hoops.


3.) Close the earring so it won't come undone.


4.) (This step is optional.) Add a charm to the earrings by attaching them with a jump ring.


5.) Add the earring hooks, and you are done!


Share
Tweet
Pin
Share
No comments

A year ago, I published a post discussing cellulite and 6 natural ways to minimize it. (If you haven't read it, I'll leave a link to that post here.) On one of the topics, I mentioned that coffee can help reduce the appearance of cellulite. I recommended making a coffee body scrub for a reason. This recipe is effective, natural, and only has three main ingredients.


COFFEE: The caffeine in coffee can help treat cellulite and lessen its appearance. Massaging coffee grounds on the affected area can improve blood flow, circulation, tighten and plump the skin. 

COCONUT OIL: Coconut oil contains collagen-boosting properties that can naturally improve the look of cellulite. It could help nourish, firm, tighten, and smooth the skin.

BROWN SUGAR: Brown sugar is a natural ingredient used in many homemade body scrubs to exfoliate. It's gentle on the skin, removes dead skin cells, moisturizes, and softens the skin.


 INGREDIENTS:

  • 3 tbsp ground coffee 
  • 5 tbsp of brown sugar
  • 3 tbsp of fractionated coconut oil or olive oil
  • 1/4 tsp vanilla extract 


DIRECTIONS:

1.) In a glass bowl, add the ground coffee, brown sugar, coconut oil, and vanilla extract. 
2.) Mix everything well to combine all of the ingredients.


HOW TO USE:

1.) Massage the mixture in the trouble area for 2-5 minutes. 
2.) Once you are done, rinse the area with water and pat dry.


NOTE:
  • Store the leftover scrub in an air-tight container.
  • Repeat this procedure 2-3 times a week.

    Click To Print    


Share
Tweet
Pin
Share
No comments


The first time I used bentonite clay was to make a detox facial mask, which I still love and use until this day. If you haven't tried it yet, I encourage you to give it a try, I promise you won't be disappointed. For the longest time, I've been wanting to use bentonite clay to make an underarm detox mask. Using a detox paste on the underarms has several benefits, as it helps the body release toxins and decreases the amount of sweat your body produces. Conventional deodorants and antiperspirants contain several chemicals and additives that do more harm than good.


Some might included...

  •  Parabens
  •  Aluminum
  •  Phthalates
  •  Propylene glycol 


Switching to natural deodorants, whether purchased or homemade, is something I recommend. Using this detox treatment when switching will make the transition easier. When I first made the switch to natural deodorants, my armpits emitted an unpleasant odor because my pores were no longer clogged. However, it's all part of the process, and it's quite natural.


To make this underarm cleanse, you only need 3 simple ingredients.

  • 1 TBSP Bentonite clay
  • 2 TSP Apple cider vinegar
  • 1 TSP Water 
  • (Optional) 3-5 drops of lemon or tea tree oil


DIRECTIONS:
  1. In a non-metal container, add the bentonite clay, vinegar, and water.
  2. Mix all of the ingredients until you get a smooth consistency.
  3. Evenly spread the solution on the armpits and wait 5-15 minutes.
  4. Rinse off the clay in the shower with a soft washcloth.
NOTE: Repeat for a few days until your body odor goes away, and follow up with a natural deodorant.


    Click To Print    


Share
Tweet
Pin
Share
No comments

 Hair accessories are a simple way of spicing up any hairdo. Since I'm always on the go, I find myself using claw clips or scrunchies to get my hair out of my face basically all the time. I tend to gravitate towards the same hair accessories and use them over and over again. I wanted to shake up my hairstyles by making my own hair clips using polymer clay. Because I'm a moon fanatic, I wanted to create a moon phase barrette. I loved how it turned out, and honestly cannot wait to make more for my family and friends.


MATERIALS NEEDED:

  • 3 different colored polymer clay
  • rolling pin
  • soda cap or anything round
  • X-Acto knife
  • hair clips or barrettes
  • adhesive of choice


DIRECTIONS:

1.) Pick 3 complementary colors and roll each clay into a snake.


2.) Combine the 3 clays by twisting and rolling until you achieve a marble effect.


3.) Roll the clay into a ball and flatten it using a rolling pin.

4.) Use anything round to cut the clay into 5 circles.

5.) Set aside one of the circles as that will be the full moon. 

  • Cut the rest of the circles the shape of all the moon phases. (You should end up with 1 full moon, 2 gibbous moons, and 2 crescent moons.)


6.) Bake the clay in the oven according to the instructions on the clay package.

7.) Allow the clay to cool for 10-15 minutes.

8.) Once cooled, use glue to attach each moon to the barrettes.


Share
Tweet
Pin
Share
No comments
Lauren Fleischmann

For years and years now, I've been dying my own hair at home. Not only do I save money by doing so, but I also enjoy the process. I love that I can give myself a fresh new look without having to leave the comfort of my own home. However, dying your hair from home can be a bit tricky, that's why I decided to share with you ladies some of my favorite tips and tricks to make dying your hair, less intimidating and a lot easier, so let's get started...


MATERIALS NEEDED:

  • Hair dye kit
  • Comb
  • Petroleum jelly
  • Hair clips
  • Gloves
  • Old T-shirt
  • Deep conditioner for your hair type


TIPS:


1.) PICK THE RIGHT SHADE.


Before you buy any hair dye, make sure to pick the right shade for your skin tone. One way of telling what your undertone is by looking at the veins on your wrist. There are 3 different kinds of undertones cool, warm, and neutral.


  • For example, if the color of your veins is bluish-purple, then you are cool-toned.
  • If they are green, then you are a warm tone.
  • If they are bluish-green, then you are neutral. This basically means you can rock both.


2.) BUY TWO BOXES.

Now that you have determined what shade to buy, make sure to purchase two boxes for your hair. Trust me, I've made the mistake of buying one box in the past and ran out halfway through the process. 


3.) STRAND TEST.

Taking the time to do a quick strand test before you decided to dye your hair is important, especially when you are using a new shade to determine the outcome of the color. To do this, take a small section of hidden hair, and apply the hair dye.


4.) PREP THE HAIR.

Before you begin to dye your hair, make sure to work with dirty hair. Dying your hair when it's dirty allows the natural oils in your hair to protect the scalp from getting irritated by harsh chemicals.


5.) PROTECT YOUR HAIRLINE.

One of the worst things about not protecting your skin from the hair dye is the leftover stain it leaves behind. Fortunately, it's easy to avoid. Just apply vaseline or lip balm on the hairline, neck, and ears.


6.) PREPARING THE DYE.

Cottonbro


Every box dye comes with different instructions on how to prepare the hair dye. Usually, the directions are easy to follow. Just mix all of the ingredients in the bottle provided or in a bowl.


7.) CHANGE YOUR OUTFIT.

The last thing you want is to ruin your favorite top by staining it with hair dye. Change into clothes you don't really care about and put on a pair of gloves to avoid staining your hands with dye.


8.) PREP YOUR STATION.

Hair dye can stain anything, from wood, plastic, walls, etc... Make sure to cover the areas where you'll be dying your hair.


DIRECTIONS ON DYING THE HAIR:


1.) SECTION YOUR HAIR.


Use large hair clips to section the hair in 4 equal sections to apply the hair dye evening.


2.) START AT THE TOP.

Cottonbro

Start by applying the dye directly to the roots since they need the most time to develop. Then, brush the hair dye down through the rest of your hair until the ends of your hair are fully covered.

Clip the hair back up and continue to do this until you are done with all 4 sections.


3.) WAITING.

Sarah Pflug

Now it's time to wait, you can set a timer to remind you when it's time to wash off the
Share
Tweet
Pin
Share
No comments
Older Posts

About me


Hi there! My name is Stefany. I am the writer and creator of Opal Crown. a crafty blog that covers DIY projects, beauty, fashion, decor, lifestyle, sustainability, and much more.

Subscribe For Weekly Updates

* indicates required

Popular Posts

  • DIY Flaxseed Mask For Hair Growth
  • DIY Aloe Vera Mask For Glowing Skin
  • Fringed Tassel Earrings
  • Brightening Turmeric & Aloe Gel Mask
  • DIY HAIR & SCALP DETOX MASK (+ How to use it)
  • DIY Beaded Phone Charm
  • How to make rice water for hair growth
  • DIY Rose Petal Body Scrub

Featured Post

DIY Embroidered Christmas Ornaments

Are you looking for a unique gift idea or new, adorable ornaments to hang on your tree this year?   I have the answer—embroidered ornaments!...

Click To Download

Click To Download
Stay focused and organized throughout the day with a daily planner to help you stay on track with your daily tasks. There are 3 different styles to choose from.

Follow Us

  • instagram
  • pinterest
  • youtube
  • tik tok

Created with by ThemeXpose | Distributed by Blogger Templates