• Home
  • Beauty
    • ALL BEAUTY
    • SKIN CARE
    • HAIR CARE
    • BODY CARE
    • NAIL CARE
    • BEAUTY TIPS
  • FASHION
    • ALL FASHION
    • DIY STYLE
    • DIY ACCESSORIES
  • Eco-friendly
    • ALL ECO
    • ZEROWASTE HOME
    • ZEROWASTE BEAUTY
    • UPCYCLE STLYE
  • Decor
    • ALL DECOR
    • DIY DECOR
    • WALL ART
    • UPCYCLE DECOR
    • CRAFTS
    • DIY FESTIVE
  • SEWING
    • ALL SEW
    • SEW STYLE
    • SEW ECO
    • SEW PROJECTS
  • Holiday
    • ALL FESTIVE
    • DIY CHRISTMAS
    • DIY AUTUMN
    • DIY HALLOWEEN
    • VALENTINE'S DAY
    • GIFTS
  • Dine
  • LIFESTYLE
  • Contact
  • Collaborate
  • Subscribe
  • POLICY
Powered by Blogger.

Opal Crown


Do you love making handmade jewelry? If you do, you'll find today's post interesting. I have 7 beautiful earring ideas that are easy and don't require any expertise. Whether you like dangling earrings or a stylish pair of studs. You'll be sure to find a style that you like. 


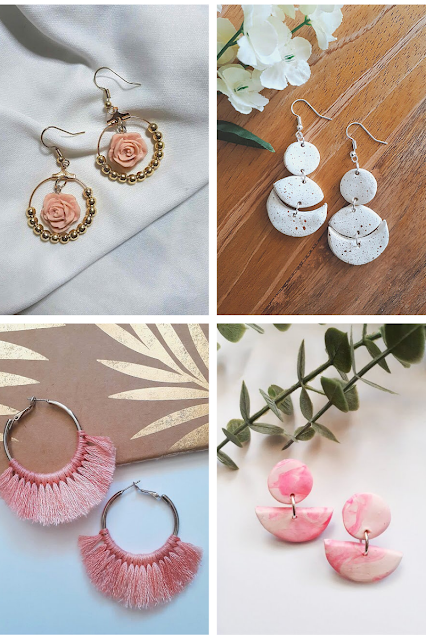
1.)  Beaded Earrings With Roses.

https://www.opalcrown.com/2021/06/diy-beaded-earrings-with-roses.html

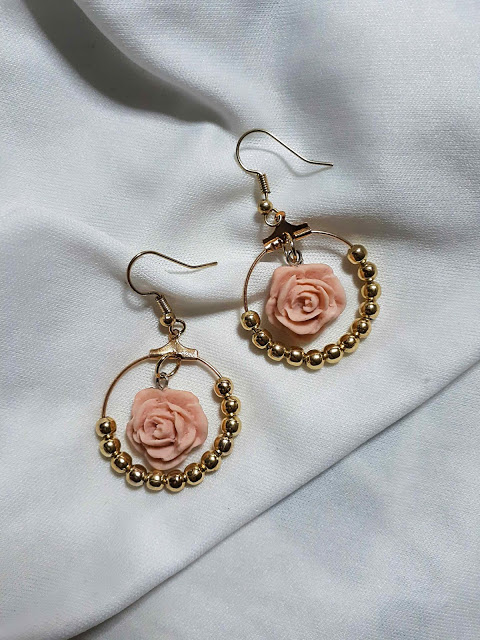
Turn a simple pair of hoop earrings into these fabulous rose-beaded hoops. All you need is golden beads and a few charms. You can customize the design of the earrings by using colorful beads or by changing the style of the charms.


2.)  Speckled Clay Earring.

https://www.opalcrown.com/2021/03/polymer-clay-earrings.html


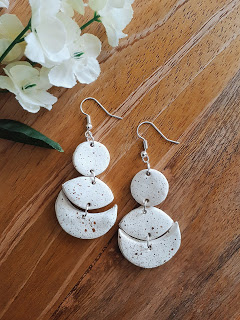
Are you looking for minimalist dangle earrings? Then you'll adore these pair of speckled earrings made of polymer clay. They look so simple, yet so elegant.
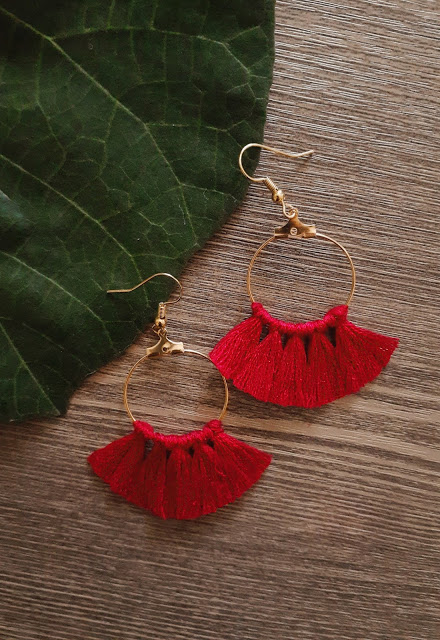


3.)  Tassel Earrings

https://www.opalcrown.com/2020/04/diy-tassel-earrings.html

Need a new pair of statement earrings? Why not make your own? These fabulously bold, and fringed earrings are simple to make at home. I always get compliments when I wear them out.


4.)  Marble Clay Earring.

https://www.opalcrown.com/2020/08/diy-marble-clay-earrings.html


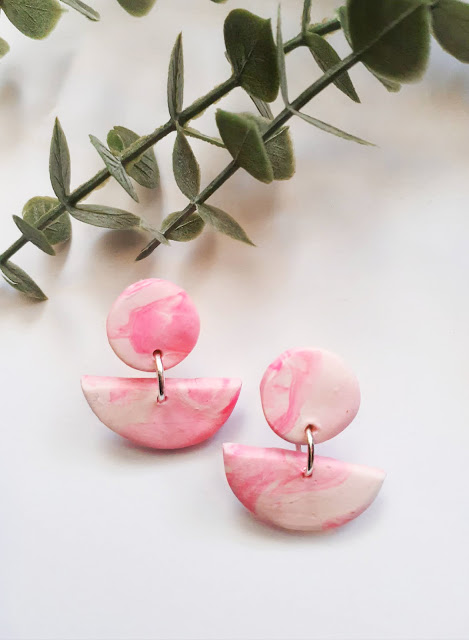
These marbled studs are my go-to earrings and making them is easier than you think! There are two different styles to choose from. Simply grab some polymer clay and then follow the DIY tutorial above to get started. 


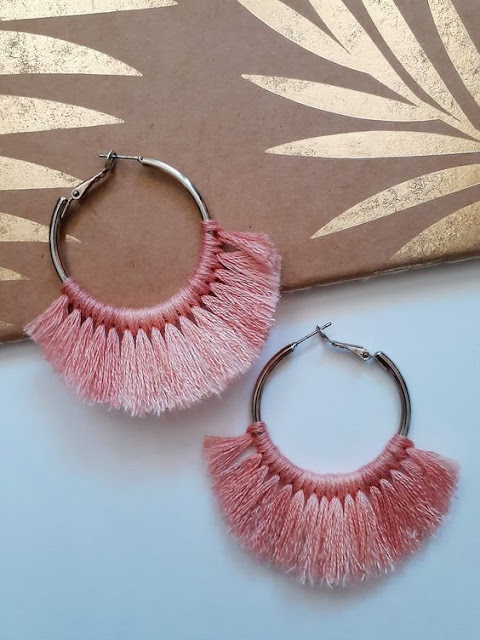
 5.)  Tassel Fan Earrings.

https://www.opalcrown.com/2020/08/diy-tassel-fan-earrings.html

If you've always wanted to rock fringe but don't know how. These red earrings are a subtle but fun way to incorporate fringe into your style.


6.) Terrazzo Earrings.


These terrazzo clay earrings are a chic way to stand out in the crowd. I love these earrings. They are so pretty and perfect for summer.


7.)  Fringed Tassel Earrings.

https://www.opalcrown.com/2021/01/diy-fringed-tassel-earrings.html


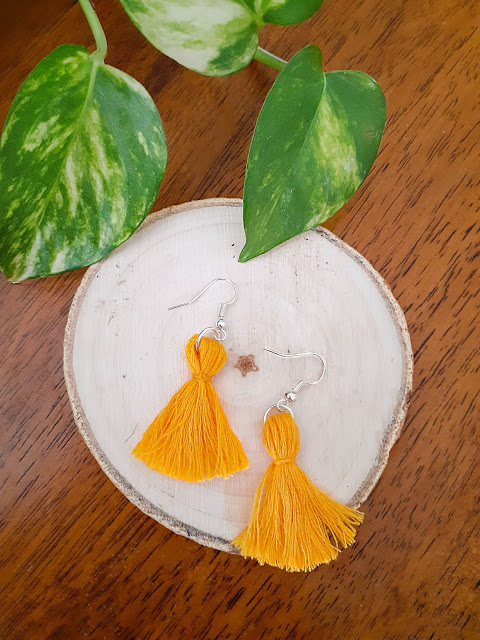
Can you believe you only need embroidery thread and 2 jewelry items for this project? These bright yellow tassel earrings are the easiest to make of the bunch. 

 P.S any of these earrings would make a great gift idea for a birthday, Mother’s Day, or Christmas! Let me know which one is your favorite...

Share
Tweet
Pin
Share
No comments

 Am I the only one who finds it challenging to find the perfect pair of denim jeans? I prefer to wear longer shorts, which can be hard to find in stores. Summer in California can be brutal, so shorts are a must! I went through my closet and found a pair of old jeans that I no longer wear. (If you can't find any jeans to turn into shorts, you can always take a trip to the thrift store. They have so many great options.


MATERIALS NEEDED:

  • Jeans
  • Scissors
  • Ruler
  • Chalk or marker
  • Iron


DIRECTIONS:

1.
) TRY ON.
Begin by putting on the jeans and determining how short you want them. Put your finger on the highest point you want them to be and make a mark there with a marker. (Because I want to fold the ends, I will mark the line lower than I want the shorts to be.)

2.) MEASURE.
Take off your jeans and lay them on a flat surface. Draw a line along the line you previously made. (A ruler comes in handy for keeping the line straight.)


3.) START CUTTING.
Carefully cut along the line you just drew.


4.) FOLD.
Fold the jeans in half to cut the other side so they're the same length.

5.) CREATE A CUFF:
 Roll the edge up 1-2 inches to create a cuff. Fold it once more. Repeat on the other side.


6.) IRON.
Finish by ironing the shorts, especially focusing on the cuffs.)

Share
Tweet
Pin
Share
No comments


My new obsession lately has been beaded rings! I purchased some of my favorite rings in a local shop in Mexico this summer. I love anything handmade, so when I saw them, I bought them immediately. These beautiful rings are what inspired today's post. If you like making your own jewelry, you'll love how easy today's project is. You can make these rings in a variety of colors, patterns, and different-sized beads. If you want to learn how I made these stylish rings in under 15 minutes, follow my step-by-step guide below...


MATERIALS NEEDED:

  • Beads
  • Stretchy String
  • Scissors
  • Adhesive of choice


DIRECTIONS:


1.) Cut a piece of elastic slightly longer than the circumference of your finger. 


2.) Put the beads of choice into a container to make the beads more accessible. (Consider using a pattern or different-sized beads to create your design.)


3.) Thread all of the beads on the elastic.


4.) Grab the ends and tie them into a double knot.


5.) (Optional) For extra hold, place a drop of superglue over the knot.


6.) Cut off the excess elastic. 


ALL DONE!


Let me know which design was your favorite. 💜

Share
Tweet
Pin
Share
No comments


I remember when phone charms were popular accessories back in the 2000s. Now that they're making a comeback, I wanted to DIY my own. This trend is so nostalgic for me, I had a few charms back in the days when flip phones were a thing. I've seen several tutorials on tik tok and noticed how easy they are to make. All you need is colorful beads and string. I purchased a few supplies at the dollar tree and got the rest at Walmart. You can find a variety of beads and craft supplies at either store for an affordable price. These charms are not only cute as accessories for your phone but also look great as chains for your keys or bags.


WHAT YOU'LL NEED:

  • Colorful beads
  • String
  • Scissors
  • Clear nail polish


DIRECTIONS:

1.) Measure the string, the size you would like the charm to be. (Mine measures 12in long)


2.) Dap a bit of clear nail polish to the end of the string to prevent it from unraveling. 


3.) Once the nail polish dries, fold the string in half to create a loop, and tie a knot. (You can see what I'm mean in the pictures below.)


4.) Now it's time to get creative and make a pattern using the beads of your choice!


5.) Thread the beads until you reach your desired length.

6.) Grab the ends and tie them into a knot. (Pull tightly to secure.)


7.) To secure the ends even more, place a drop of superglue over the knot.


8.) All done!


I also made a neutral charm to match my phone case. Let me know which charm was your favorite.


Share
Tweet
Pin
Share
1 comments

Designing earrings is so much fun, especially if you like wearing unique jewelry. My outfits are often simple, so to spice things up, I always throw on a pair of dangling earrings. Accessories always help add interest to any of my outfits. I've been wanting new earrings, so I took the opportunity to make a new pair. I headed to the nearest craft store to buy all the supplies I needed to tackle this project.


MATERIALS NEEDED:

  • Hoop earrings
  • Earring hooks
  • Beads
  • Pliers
  • Optional: charms  (I made my own, learn how here.)


DIRECTIONS:

1.) Carefully open the hoop earring.


2.) Thread the beads onto the hoops.


3.) Close the earring so it won't come undone.


4.) (This step is optional.) Add a charm to the earrings by attaching them with a jump ring.


5.) Add the earring hooks, and you are done!


Share
Tweet
Pin
Share
No comments


I love making jewelry with polymer clay because it's easy to work with. You can create different designs using tools to make a variety of shapes. You can create custom colors by mixing different colored clay together. The options are limited. All you need is a little inspiration to get you started. Today, I'm going to share 2 simple techniques for creating clay earrings.


MATERIALS:

  • Polymer Clay
  • Clay Sculpting Tools
  • Shape Cutters
  • Rolling Pin
  • Pliers
  • Jump Rings
  • Earring Hooks
  • Earring Post
  • Adhesive 
  • Acrylic Paint + Brushes


SPECKLED EARRINGS:


1.) Work the clay with your hands until it is soft.

2.) Use a rolling pin to flatten the clay to the desired thickness.

3.) Use two different-sized round cutters to cut two small circles and two larger circles.

4.) Use the round cutter to cut the larger circles into crescent moons.

5.) Use a pin to poke holes into the clay earrings.

6.) Bake according to the instructions on the clay packaging.

7.) Allow the earrings to cool completely.

8.) Dip a paintbrush in acrylic paint and flick the brush on the clay earrings.

9.) Once the paint dries, attach the jump rings and earring hooks.


TERRAZZO EARRINGS:


1.) Begin by working the clay in your hands until it is soft and smooth.

2.) Roll the clay flat.

3.) Cut tiny pieces of different colored clay.

4.) Randomly spread the small pieces of clay over the white clay to create the terrazzo design.

5.) Gently press the colored clay to attach them to the white clay.

6.) Use different-sized round cutters to cut two small circles and two larger circles.

7.) With a clay knife, cut a v shape onto the larger circles.

8.) Bake the earrings in the oven.

9.) Glue the bottom of the smaller circles to the top edge of the larger circles.

10.) Once it dries, glue the earrings posts to the back. 


Share
Tweet
Pin
Share
No comments


Hi everyone! I'm excited to show you how to make a fun pair of fringe earrings. I know that I've already done a couple of different versions of tassel earrings in the past, but for today, I'll be showing you the easiest ones to make so far. I love a good statement earring, especially since I dress very casual. In lots of denim with darker shades, so I always need a pop of color. Since I tend to shy away from colorful clothes, a great way of adding a subtle pop is with these stylish earrings. 


 MATERIALS:

  • 1 Embroidery thread
  • Scissors
  • Pliers
  • 2 Jump rings
  • 2 Earring hooks


DIRECTIONS:

1.) Cut 2 pieces of the thread, the same length, approx 6 inches long.


2.) With the pliers, open the jump rings.

3.) Insert the jump ring on one side of the embroidery thread.

4.) Attach the earring hook to the jump ring.

5.) Repeat the same step on the other side.

6.) Cut the embroidery thread in half to create 2 tassel earrings.

7.) Take the piece of embroidery floss that we cut in step 1, wrap it around the earring, and tie two knots.


8.) If you like the length of the earrings, you can stop here. I decided to cut mine shorter. It's all personal preference.

9.) Comb the ends of the tassels and you are done.


Share
Tweet
Pin
Share
No comments

 Hair accessories are a simple way of spicing up any hairdo. Since I'm always on the go, I find myself using claw clips or scrunchies to get my hair out of my face basically all the time. I tend to gravitate towards the same hair accessories and use them over and over again. I wanted to shake up my hairstyles by making my own hair clips using polymer clay. Because I'm a moon fanatic, I wanted to create a moon phase barrette. I loved how it turned out, and honestly cannot wait to make more for my family and friends.


MATERIALS NEEDED:

  • 3 different colored polymer clay
  • rolling pin
  • soda cap or anything round
  • X-Acto knife
  • hair clips or barrettes
  • adhesive of choice


DIRECTIONS:

1.) Pick 3 complementary colors and roll each clay into a snake.


2.) Combine the 3 clays by twisting and rolling until you achieve a marble effect.


3.) Roll the clay into a ball and flatten it using a rolling pin.

4.) Use anything round to cut the clay into 5 circles.

5.) Set aside one of the circles as that will be the full moon. 

  • Cut the rest of the circles the shape of all the moon phases. (You should end up with 1 full moon, 2 gibbous moons, and 2 crescent moons.)


6.) Bake the clay in the oven according to the instructions on the clay package.

7.) Allow the clay to cool for 10-15 minutes.

8.) Once cooled, use glue to attach each moon to the barrettes.


Share
Tweet
Pin
Share
No comments

HOW I DYED MY HAIR LIKE AN E-GIRL


I don't know if being quarantined for so long has anything to do with me urging a new look or if it's the fact that I haven't changed my hair color in the last six years. It's about time I try a different style and step out of my comfort zone. The E-girl hairstyle is something that caught my eye, as it seems pretty easy to achieve, it won't require too much maintenance, and could be done at home without having to go to the salon. 


At first, I was going to dye the strands a vibrant color, but after bleaching my hair, I released I liked the blonde highlights. To complement them, I dyed the rest of my hair a darker shade of brown to add contrast against the rest of my hair. However, in the future, I am planning on dying my chunky strands a bright pink or a pastel purple for a pop of color. I'm so excited to share with you guys how easy it was to achieve the E-girl aesthetic in 6 simple steps or 10 steps if you want different colored strands.


SUPPLIES NEEDED:
  • Developer
  • Bleach powder
  • Toner
  • Aluminum foil
  • Brush
  • Hair clips
  • Optional: Vibrant hair color

DIRECTIONS:

1.) Start by parting your hair down the center. Use a wide-tooth comb to separate your fringe from the rest of your hair by making a triangular shape and clip away the rest of your hair.

2.) In a container, add two parts developer and one part bleach, and mix well to combine.

3.) Apply the mixture to the mid-lengths and the ends of the hair, as it takes the longest to lighten. Once your hair is covered in bleach, use aluminum foil to cover your strands.

4.) Let the bleach sit until the hair starts to lift and then apply it to the roots.

5.) Wait 10-15 minutes, or until you achieve the desired outcome. (Always make sure to follow the directions of the products you are using.)

6.) Once the timer is up, wash your hair with shampoo and follow up with a toner to get rid of brassy hair. ( If you like the blonde streaks, then stop here, but if you'd prefer a pop of color, then follow the steps down below.)

7.) Once your hair has dried, add vaseline around your hairline and ears to avoid staining your skin.

8.) Now it's time to dye your hair with any color dye you'd prefer. Evenly distribute the color with a brush, until your strands are fully saturated.

9.) Cover your hair with a plastic cap and leave the dye on the hair for 30-45 minutes or depending on the instructions on the pack.

10.) Rinse your hair in the sink until the water runs clear.


Share
Tweet
Pin
Share
No comments
Older Posts

About me


Hi there! My name is Stefany. I am the writer and creator of Opal Crown. a crafty blog that covers DIY projects, beauty, fashion, decor, lifestyle, sustainability, and much more.

Subscribe For Weekly Updates

* indicates required

Popular Posts

  • DIY Flaxseed Mask For Hair Growth
  • DIY Aloe Vera Mask For Glowing Skin
  • Fringed Tassel Earrings
  • Brightening Turmeric & Aloe Gel Mask
  • DIY HAIR & SCALP DETOX MASK (+ How to use it)
  • DIY Beaded Phone Charm
  • How to make rice water for hair growth
  • DIY Rose Petal Body Scrub

Featured Post

DIY Embroidered Christmas Ornaments

Are you looking for a unique gift idea or new, adorable ornaments to hang on your tree this year?   I have the answer—embroidered ornaments!...

Click To Download

Click To Download
Stay focused and organized throughout the day with a daily planner to help you stay on track with your daily tasks. There are 3 different styles to choose from.

Follow Us

  • instagram
  • pinterest
  • youtube
  • tik tok

Created with by ThemeXpose | Distributed by Blogger Templates